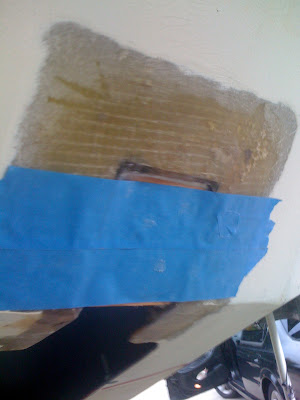
 Monday and Tuesday, August 3rd and 4th, was spent making repairs to the stern...more specifically, the engine well. The previous owner had apparently cut and glassed in a notch directly above the engine well - here is picture showing this alteration to the Sea Sprite's original design.
 I thought a lot about how to go about making this repair, and bring the stern back to its original appearance. Finally, I came up with a rather simple, structurally-sound, and effective solution. I cut 1/4" birch panel into smaller strips - approximately 1/2" by 4" in length. The strips would serve as structure to then mount another piece of the panel to bridge the notched area - a layer of fiberglass would then lay over the notch.
My first step was to grind a slight bevel around the area to be repaired; also, to sand the interior of the notched area. The sanding was to create a good surface to receive epoxy and fiberglass, creating a good mechanical bonding surface. Once I had the area sanded and washed with solvent, I painted on neat epoxy and allowed to become tacky to the touch. Next step was to mix epoxy and West System 404 high-density filler, and then bond the panel strips to the inside the notched area. Once the strips were placed into the notched area, I left to cure.
The next day, I sanded the surface and wiped down with solvent. I then painted the panel strips with neat epoxy, and allowed to tack up. While the neat epoxy was gelling, I cut a piece of the birch panel to fit within the notched area on the stern - bridging the void. Once the square was cut, I sanded and wiped with solvent; finally, I painted the piece with neat epoxy. As all pieces were becoming tacky to the touch, I mixed more epoxy and 404 high-density filler, applied it to the structural panel strips, then placed the square birch piece onto the strips. You can see in the picture above, the blue tape is holding everything in place while the epoxy cures. Next step will be to apply 6oz fiberglass cloth, fill and fair to a smooth finish.
Here is a picture from inside the engine well showing notched area being closed off.
For Tuesday, the 11th of August, I made a first pass sanding of Froonie's topsides. Using the Porter Cable 7335 and 120 grit pads, I ran across the topsides - edge of lower boottop and top edge of bottom paint to the rail.

Sanding the topsides down has removed a lot of displeasing paint and grime. I did apply Interlux 202 Fiberglass Solvent Wash to remove wax and other contaminates. However, I forgot my respirator and this stuff is not friendly to the nervous system...so, I attempted sanding without completely washing the topsides. It appears that the sanding was successful, though I will come back and wash the topsides down and prepare for filling and fairing gouges and other small scratches and nicks.

No comments:
Post a Comment